There are times when it is appropriate to allow users to upload data in a non-traditional fashion. Oracle has provided a flexible and relatively easy upload, download, update method, in Web ADIs, to allow users to leverage an interface that they are generally very comfortable with Microsoft Excel. This portal to gather, modify and upload information into Oracle e-Business Suite modules, opens a new window of possibilities in user interfaces.
Best known for the standard Web ADI integrator used to upload journal entries, custom Web ADI features are quickly becoming a vaunt guard among many modules and business functions. The process setup a custom integrator is quite straight forward but generally does require some technical capabilities. Below are the basics steps required in setting up a custom Web ADI, but please note that there are numerous variations and options, particularly with menus and validation.
The Web ADI operates by combining the macro functionality in Excel with the open interface nature of APIs in Oracle. The macro connects the data in the spreadsheet to a procedure in Oracle and allows for a two way communication between the procedure and the user of the spreadsheet. Once enabled a new menu option appears in Excel that gives the user the ability to initiate the macro that will call the procedure in Oracle; the procedure normally calls an API that will process the data in the spreadsheet. The beauty of simplicity in this interaction is that Oracle only has to deal with one record at a time and does not need to manage any looping mechanism as that is handled by the macro in the spreadsheet.
Here is how you can set up a simple Web ADI integrator.
- Enable Macro Security in Microsoft Excel. This is a one-time security setting that you need to complete in Excel before you can use WebADI.
a) Open Excel and go to Tools > Macro > Security

b) Open the Security window and click on the Trusted Sources tab
c) Check the Trust access to Visual Basic Project checkbox

- I found it necessary to execute this script(s) to enable the UI for setting up the WebADI
column information
update bne_integrators_b
set enabled_flag = ‘Y’
where application_id = 231
and integrator_code = ‘INTERFACE_COLS’;
- It is necessary to create a view to retrieve the data that you want to add to or update; however if you are only uploading data then a view is not necessary.
- Identify or create a procedure that will upload or update the information you are working with.
- Create a Custom Integrator – this is done through MS Excel

- Assign it to form function that you have access to
Integrator Application Short Name | Integrator User Name | Form Function List |
XXCUS | NIS Add Organization Parameters | MASTER_DATA_ADI |
This information is defaulted | This information is defaulted | This is the custom form that function that needs to be set up in order to control access to the custom integrator |
- Define the new Layout
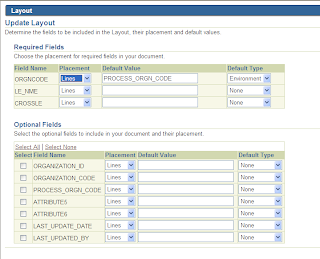
Responsibility: Desktop Integration
Path: Define Layout
a) Select the new Integrator from the list of available Integrators and click Go
b) Click Define Layout to create a new layout and click Update next to an existing layout to modify that layout
c) Defining a new layout (NOTE: DO NOT use the browser back and forward buttons, use the forms Cancel and Back buttons):
d) Provide a layout name & layout key, then update Default Types, etc as desired
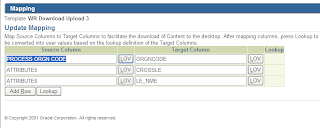
- Define the mapping
8. Create Template for updating existing records
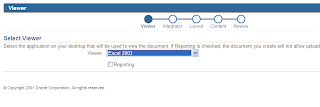
a. Open Create Documents
b. Choose the viewer
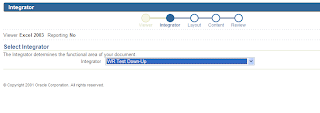
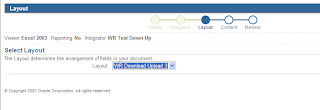
- Select the new integrator
- Select the proper Layout
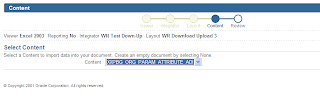
- Select the Content – represented by the view that will pre-populate the template
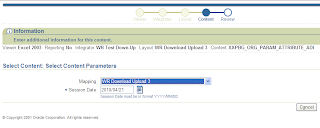
- Select the correct mapping and the Session date
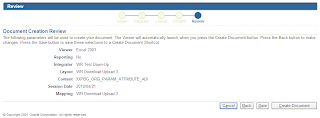
- Review the information and click Create Document to generate the template
As I mentioned before there are numerous ways to improve the visual and usability aspects of the spreadsheet interface through the use of lists of values, renaming/formatting columns, and validation.